
Prerequisite:
- Please ensure you’ve installed RabbitMQ in your local machine.
- Alternatively, you may run RabbitMQ docker container
docker run -it --rm --name rabbitmq -p 5672:5672 -p 15672:15672 rabbitmq:3.9-management
- We will using RabbitMQ Javascript client amqplib. Please ensure you’ve setup a new project with this package installed.
- Alternatively, you can also clone this project to have application-ready demonstrations.
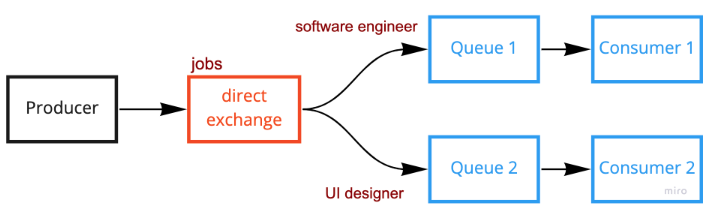
We are going to demonstrate the Direct exchange message queue flow as shown in the figure below
Code demonstration
We will run publisher.js and comsumer.js separately.
publisher.js
const amqp = require("amqplib");
async function directExchange() {
  try {
    const rabbitmqUrl = "amqp://localhost:5672";
    const connection = await amqp.connect(rabbitmqUrl);
    const exchange = "jobs";
    const exchangeType = "direct";
    const routingKey = "software_engineer";
    const options = {};
    const payload = {
      Name: "Jeff",
      yearOfExperience: 2,
    };
    let channel = await connection.createChannel();
    await channel.assertExchange(exchange, exchangeType, options);
    channel.publish(
      exchange,
      routingKey,
      Buffer.from(JSON.stringify(payload)),
      options
    );
  } catch (error) {
    console.error(error);
  }
}
directExchange();
consumer.js
const amqp = require("amqplib");
async function directExchangeConsumer() {
  try {
    const rabbitmqUrl = "amqp://localhost:5672";
    const connection = await amqp.connect(rabbitmqUrl);
    const exchange = "jobs";
    const exchangeType = "direct";
    const routingKey = process.argv[2];
    const options = {};
    let channel = await connection.createChannel();
    await channel.assertExchange(exchange, exchangeType, options);
    const { queue } = await channel.assertQueue("", options);
    channel.bindQueue(queue, exchange, routingKey);
    channel.consume(queue, (data) => {
      console.log("Received", JSON.parse(data.content.toString()));
      channel.ack(data, false, true);
    });
  } catch (error) {
    console.error(error);
  }
}
directExchangeConsumer();
Before we start:
- To have better visualization, please run the
publisher.jsin 1 terminal andconsumer.jsin 2 terminals. You can either use the split terminal in Visual Studio Code or run the files in your machine terminals. - If you’re not using the example from the provided Git Repository. Please ensure you run the
consumer.jsin 2 terminals followed by runningpublisher.jsin 1 terminal and indicate yourrouting_keyvalue when running theconsumer.jsscript. The following are the arguments used in example below:node consumer software_engineernode consumer ui_designernode publisher
Result for this example
Steps to demo from Git Repository
-
Open a new terminal
-
npm run devto start the server -
Open 2 new terminals and run the following command:
npm run consumer
-
Specify your
routing_keyas shown in below:{ "payload":{ "name": "Jeff", "yearOfExperience": 2, }, "properties":{ "routing_key":"software_engineer" } } -
Make a POST request to
http://localhost:3000/api/direct/exchange/jobswith the payload above. -
Note : If you wanted to add your new custom data such as
routing_key,exchange nameand etc, please ensure you have read the instructions in ReadMe
Result
Explanations
-
Publisher
- Before process started, we need to first connect to the RabbitMQ.
- The next step is to make a connection with the channel and start creating our desired exchange by using
assertExchange()method- In here we specify the following argument’s value:
- exchange name is
jobsin this example - exchange type is
direct - we didn’t specify the options in this example but feel free to have a look at the available options at here
- exchange name is
- In here we specify the following argument’s value:
- And now, we can start publishing our message to the exchange by using
publish()method with the following arguments:- we can use back the exchange name we specified earlier ‘jobs’
routingKeyin this case played an important property as in the consumer binding queue process, the broker would need to refer to this value and bind to the corresponding queue.payload, Publish message only accepts buffer payload. To achieve this, we can first stringify our payload if it’s an object and convert it into a Buffer by usingBuffer.fromoptions, we didn’t specify the options in this example but feel free to have a look at the available options at here
-
Comsumer
- Before the process is started, we need to first connect to the RabbitMQ.
- The next step is to make a connection with the channel and start creating our desired exchange by using
assertExchange()method- In here we specify the following argument’s value:
- exchange name is
jobsin this example - exchange type is
direct - we didn’t specify the options in this example but feel free to have a look at the available options at here
- exchange name is
- In here we specify the following argument’s value:
- And now we can start to creating our queue and bind with the exchange we created earlier.
- As you can observe from the code, we are putting it as an empty string when creating the queue
channel.assertQueue("",options). This is because we do not need to bother with the queue name when binding the exchange and queue. By putting an empty string for the queue name, it will return us a unique and random queue name such asamq.gen-JzTY20BRgKO-HjmUJj0wLg - There are some useful options we can take note of when creating the queue :
durable: if true, the queue still stays alive even if we restart the broker.exclusive: if true, queue will be deleted when the connection is closed.expires: specify the time in a millisecond to delete the queue when there is no consumer connecting to the queue.- checkout other options here
routingKeyproperty is very important fordirectexchange as it will refer to the message properties sent from the publisher and bind the exchange with its queue if theirroutingKeyvalue is matched.
- As you can observe from the code, we are putting it as an empty string when creating the queue
- After the binding process is finished, we can now consume the message whenever there is an incoming message from the broker by using
.consume()method - When we received the message, we can now acknowledge the message by using
ack()method so that the broker will know we successfully retrieve the message.